What to Do with Hyacinth Bulbs After Flowering in Water?
Do you love hyacinths but feel lost about what to do with hyacinth bulbs after flowering in water? Watching those vibrant blooms fade can leave you wondering how to keep your bulbs healthy for next season. You’re not alone—this is a common question for hyacinth lovers!
Here’s the good news: caring for hyacinth bulbs after flowering in water is simple. Let the leaves naturally die back, remove the bulb from the water, and store it properly. With a little attention, your bulbs can bloom beautifully again (whether you replant them or store them for the next season).
Stick with me to learn everything you need to know to care for your bulbs like a pro. Let’s keep your hyacinth bulbs thriving year after year!
What to do with hyacinth bulbs after flowering in water?
After flowering in water, hyacinth bulbs should be allowed to go dormant. Gradually stop watering, remove and clean the bulb, and store it in a cool, dry place. You can replant it in soil during the fall to give it time to recover for future blooms.
1. Let the Leaves Die Back Naturally
Once the flowers fade, don’t rush to trim the green leaves. These leaves are vital for storing energy that the bulb will need for future growth. The leaves act as solar panels, soaking up sunlight to produce food for the bulb. Cutting them prematurely weakens the bulb and reduces its chances of blooming again.
You should place the bulb in a spot that gets plenty of “indirect” light. Too much sunlight can dry out the leaves too quickly, stopping energy storage.
Note: Let the leaves yellow and die naturally. This process can take weeks but is essential for the bulb’s recovery.
Only trim the leaves once they are completely dry.
2. Stop Watering Gradually
Hyacinths forced to grow in water rely heavily on moisture. But once the flowering stage is over, reducing water gradually is important. Here’s how to manage this step:
- Start When Leaves Yellow: Begin reducing water when the leaves start turning yellow. This signals that the bulb is entering dormancy.
- Cut Back Slowly: Reduce the water level week by week instead of stopping completely. This prevents stress on the bulb.
- Avoid Stagnant Water: As you decrease the water, make sure the remaining water stays fresh to avoid bacteria or mold.
- No Overwatering: Never let the bulb sit in water after the leaves have dried. Prolonged exposure can cause rot.
- Dry Bulb Signals Readiness: Once the bulb is completely dry and the roots look shriveled, it’s time to move to the next step.
3. Remove the Bulb from the Water
Taking the bulb out of water carefully is crucial to avoid damage. Follow these steps:
- Wait Until Ready: Ensure the leaves are dry and the bulb has fully stopped growing.
- Lift Gently: Carefully lift the bulb from the water without pulling on the leaves or roots. Use your fingers to cradle the base of the bulb.
- Trim Dead Leaves: With clean scissors, cut off the dried leaves and any remaining roots that look dead or mushy.
- Inspect for Problems: Check the bulb for signs of softness, mold, or unusual discoloration. Healthy bulbs feel firm and dry.
- Prepare for Drying: Place the bulb on a flat surface in a cool, ventilated area to let it dry out completely before cleaning further.
4. Dry and Clean the Bulb
Drying and cleaning the bulb ensures it’s ready for storage or replanting. Here’s what to do:
- Air Dry Naturally: Lay the bulb on a dry surface in a shaded, well-ventilated area.
- Brush Off Debris: Once the bulb is dry, gently remove soil particles, dead roots, or leftover debris. A soft brush works well for this.
- Skip Water Rinsing: Avoid rinsing the bulb with water during cleaning. Moisture can trigger rot or mold during storage.
- Inspect for Pests: Look for any signs of insects, like tiny eggs or larvae. Remove them manually before storing the bulb.
- Ensure Full Dryness: Double-check that the bulb is completely dry before moving to the storage stage.
5. Store the Bulbs: How to store hyacinth bulbs after flowering?
Proper storage keeps your bulbs safe and healthy until the next planting season. Follow these guidelines:
- Pick the Right Container: Use a breathable material like a paper bag, mesh sack, or ventilated box to store the bulbs.
- Cool and Dark Location: Store bulbs in a place with temperatures between 40–50°F (4–10°C). A basement or unheated garage is ideal.
- Keep Them Dry: Moisture is the enemy of stored bulbs. Make sure the storage area is free from humidity and pests.
- Space Bulbs Apart: Avoid crowding bulbs in storage to allow for airflow.
- Label Containers: Label your storage container with the type and date so you can identify the bulbs easily for replanting.
6. Plant for the Next Season
Hyacinths can bloom again with proper planting in soil. Here’s how to do it right:
- Timing: Plant the bulbs in the fall, about 6–8 weeks before the first frost. This gives them enough time to establish roots.
- Choose a Sunny Spot: Pick a location that receives full or partial sunlight for healthy growth.
- Prepare the Soil: Use well-draining soil and enrich it with compost or a balanced bulb fertilizer.
- Planting Depth: Dig holes 6–8 inches deep, place the bulbs pointy side up, and cover them with soil.
- Space Carefully: Leave at least 4–6 inches between bulbs to prevent overcrowding and allow for air circulation.
7. Check for Bulb Health
Before storing or planting, always assess the health of your bulbs:
- Look for Rot: Bulbs that feel soft or have dark, mushy spots should be discarded.
- Inspect Roots: Remove any dead or dry roots gently to encourage healthy regrowth.
- Wipe Off Mold: Minor mold can be wiped clean with a dry cloth, but heavily infested bulbs should be thrown away.
- Check Firmness: A healthy bulb will feel firm and smooth to the touch.
- Separate Problematic Bulbs: Store questionable bulbs separately to avoid contaminating healthy ones.
8. Consider Fertilizing (Optional)
Fertilizing can give your bulbs an energy boost before dormancy:
- Select a Bulb Fertilizer: Choose a balanced fertilizer made specifically for flowering bulbs.
- Apply After Cleaning: Dust a small amount of fertilizer onto the bulb or mix it into the soil where you’ll plant.
- Avoid Overdoing It: Too much fertilizer can harm the bulb, so stick to the manufacturer’s recommendations.
- Use During Planting: When planting in soil, mix the fertilizer into the hole before covering the bulb.
- Repeat as Needed: Fertilize once a year for stronger and healthier blooms.
9. Transition to Soil for Recovery
Bulbs forced in water benefit from being planted in soil:
- Prepare Well-Drained Soil: Use loose, nutrient-rich soil that doesn’t retain excess water.
- Plant with Top Exposed: Keep the bulb’s top slightly above the soil surface for better ventilation.
- Water Sparingly: Avoid overwatering, especially during dormancy. Light watering is enough to keep the soil slightly moist.
- Place in Sunlight: Ensure the potted or garden bulb gets enough sunlight to stimulate healthy growth.
- Monitor for Growth: Look for new green shoots in the following season as a sign of successful recovery.
10. Plan for Future Forcing
If you enjoyed forcing hyacinths in water, here’s how to plan for next season:
- Buy Pre-Chilled Bulbs: Start fresh with bulbs that have already been prepared for forcing.
- Chill Reused Bulbs: If using old bulbs, chill them in the fridge for 6–8 weeks to mimic winter conditions.
- Start Forcing Early: Begin the forcing process in late fall for blooms by mid-winter.
- Use Fresh Water: Replace the water regularly to keep it clean and oxygen-rich.
- Enjoy the Process: Forcing bulbs can be repeated each year, adding a beautiful touch to your home during the colder months.
How to know when hyacinth bulbs have finished flowering in water?
Hyacinth bulbs complete their flowering cycle in water when their flowers fade, the stalk dries, and the leaves gradually turn yellow. This process signals that the bulb has done its job for the season and is entering dormancy.
Recognizing these stages helps you know when to start aftercare and ensure the bulb’s long-term health.
1. Flowers Begin to Fade
The first noticeable sign that your hyacinth bulb has finished flowering is when the blooms start to fade. This is a gradual process and can be subtle at first. The vibrant, bright colors of the petals may begin to lose their intensity, giving the flowers a dull, muted appearance.
Eventually, the petals might curl inward, showing the plant’s natural progression toward the end of its blooming cycle.
If you touch the flowers, you might notice they feel softer or even brittle at the edges. Some petals may even fall off on their own. This stage is your signal to start preparing for the bulb’s next phase. At this point, there’s no need to intervene—let the plant naturally complete its flowering process.
It’s important to know that fading flowers don’t mean the bulb is unhealthy. This is simply part of the plant’s lifecycle. The bulb has expended its stored energy to produce the flowers, and now it needs time to rest and rebuild.
2. Flower Stalk Dries Out
After the flowers have faded, the flower stalk itself begins to dry. This is another clear sign that the flowering period is over. The stalk, which was once firm, will become thinner. It will also start to lose its green color. It may turn yellow or brown, signaling that it is no longer actively supporting growth.
At this stage, the stalk might feel brittle to the touch. If you gently bend it, it could snap off easily. This drying is a natural process, and you don’t need to remove the stalk immediately. Allow it to dry out completely, as this ensures that any remaining nutrients from the stalk can be reabsorbed by the bulb.
This stage is a good time to check the bulb’s condition. While the stalk dries, observe the base of the plant for any signs of softness or rot. A healthy bulb will remain firm and intact. If the stalk looks excessively mushy or moldy, it’s worth investigating further to ensure the bulb itself hasn’t been compromised.
3. Leaves Stay Green Initially
Even after the flowers and stalk have dried, the leaves might stay green for a while. This stage can be confusing because the plant might still appear alive even though the flowering is done. The green leaves are working hard during this period to collect as much sunlight as possible.
Through photosynthesis, the leaves convert sunlight into energy, which is stored in the bulb for the next blooming cycle.
It’s essential not to interfere at this point. Cutting the leaves prematurely interrupts this energy-gathering process, leaving the bulb weaker. Keep the bulb in a well-lit area, but avoid direct sunlight, which can dry the leaves out too quickly. A spot near a bright window is usually ideal.
This phase can last for a few weeks, depending on the conditions and the bulb’s health. During this time, continue to monitor the bulb for any signs of overwatering or root issues. If the roots look healthy and the leaves remain vibrant, the bulb is transitioning smoothly toward dormancy.
Pruning and post-bloom care are essential for plant health. Learn how to identify and cut the right stalks on a dracaena for optimal growth.
4. Leaves Begin to Yellow
One of the most telling signs that a hyacinth bulb has completed its lifecycle in water is when the leaves begin to turn yellow. This change happens gradually. The bright green color fades to a pale yellow, and the leaves start to lose their firmness. You may notice them drooping or becoming softer to the touch.
Yellowing leaves are a natural part of the bulb’s preparation for dormancy. During this stage, the bulb is still absorbing nutrients from the leaves, which is why it’s important not to cut them off prematurely. Let the leaves dry out entirely before removing them, as they are still providing valuable resources to the bulb.
As the yellowing progresses, you might also notice that the bulb no longer requires as much water. It’s a good idea to gradually reduce the water level at this point, preventing the risk of rot or mold. Once the leaves have completely dried, the bulb is ready for the next stage of care, such as cleaning or storage.
5. Entire Plant Stops Growing
The final stage in determining that your hyacinth bulb has finished flowering is when the entire plant stops growing. By this point, the flowers, stalk, and leaves will all have dried and withered completely. The plant will appear lifeless, but the bulb beneath the surface is alive and entering a dormant phase.
When the plant stops growing, it’s a clear signal that the bulb is ready for aftercare. This is when you can gently remove the bulb from the water, clean it, and prepare it for storage or replanting. If the bulb has been kept in good conditions, it will feel firm and show no signs of softness or discoloration.
It’s important to note that a dormant bulb is not “dead.” The bulb is simply resting, storing energy for the next growing season. With proper care during dormancy, the bulb can produce another beautiful bloom in the future.
When to grow hyacinth bulbs in water?
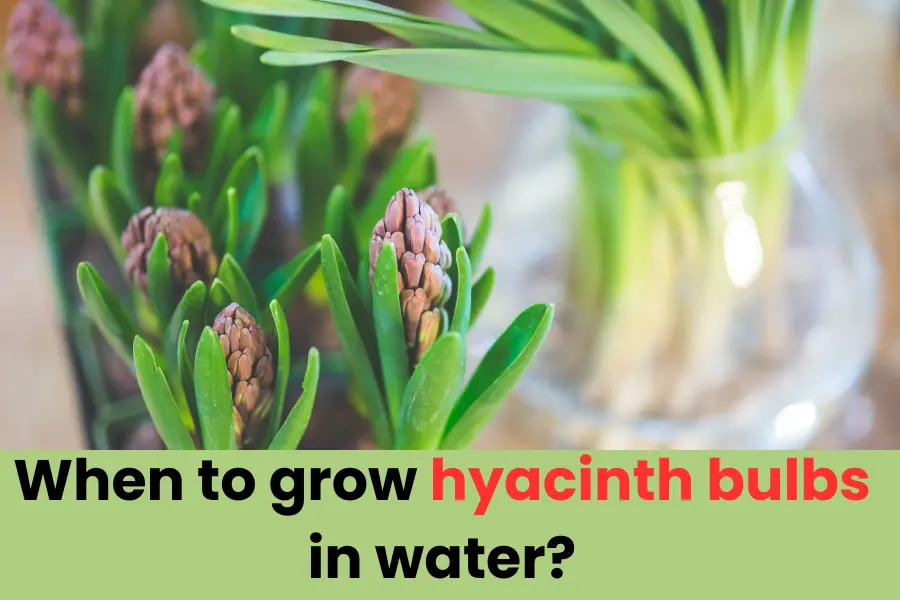
The best time to grow hyacinth bulbs in water is during the late fall, typically around October or November. This timing allows you to enjoy their blooms indoors during the winter months.
Growing hyacinth bulbs in water involves a process called forcing, which tricks the bulb into blooming out of its regular seasonal cycle.
To start, you need to make sure the bulbs are pre-chilled. If they aren’t already chilled, you’ll need to refrigerate them for 8–12 weeks at a temperature of 40–50°F (4–10°C). This chilling period mimics winter and prepares the bulbs for growth.
Once the bulbs are ready, place them in a vase with just enough water to touch the base of the bulb. Position the vase in a cool, dark area for the first few weeks to allow the roots to grow without triggering top growth prematurely. After the roots develop, move the vase to a brighter location, like a windowsill, to encourage the sprouting and flowering process.
Timing your planting carefully lets you control when the hyacinths will bloom. For example, if you want flowers for Christmas, start forcing the bulbs in mid-October. If you aim for Valentine’s Day blooms, begin the process in late November.
With careful preparation, you can enjoy these stunning flowers indoors at just the right time.
Hyacinth in water vase care
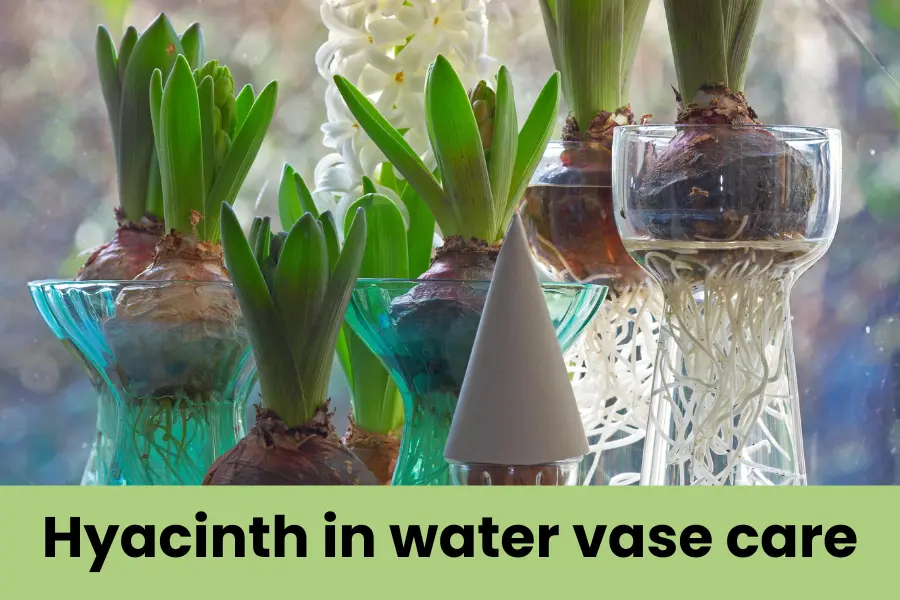
Hyacinth bulbs in water vases need proper care to thrive. Keep the water clean and at the right level, ensure the vase is in bright but indirect sunlight, and maintain a cool environment. Trim roots as needed, and avoid submerging the bulb itself to prevent rot and ensure healthy growth.
1. Keep the Water Clean
Keeping the water clean is one of the most important steps for healthy hyacinth growth. Dirty water can cause bacteria to grow, leading to root rot and an unhealthy bulb. Change the water every three to four days to maintain freshness.
Use room-temperature water when refilling the vase. Cold water can shock the roots, while warm water might encourage bacterial growth. Fresh, clean water ensures the bulb gets the nutrients it needs without risking contamination.
When changing the water, inspect the roots. Rinse them gently if they appear slimy, as this is often a sign of bacteria buildup.
Avoid overfilling the vase. The water level should just touch the base of the bulb without covering it. Submerging the bulb itself increases the risk of rot, which can harm or even kill it.
Lastly, always use a clear vase to monitor the water’s clarity. This way, you can see when it starts to get cloudy and needs changing. Clean water equals happy, healthy blooms!
2. Ensure Bright, Indirect Sunlight
Hyacinths need light to grow, but direct sunlight can harm them. Place your vase near a window where it gets bright, indirect sunlight. Direct exposure can dry out the roots and damage the delicate bulb.
A windowsill facing east or north is often ideal. These spots provide gentle morning or filtered light without harsh afternoon rays. If the vase sits in a spot with strong light, consider using sheer curtains to diffuse it.
During the initial growth phase, keep the bulb in a darker area to encourage root development. Once the roots are established and shoots begin to appear, gradually move the vase to brighter conditions.
If you notice the stems leaning toward the light source, rotate the vase every couple of days. Moreover, monitor the leaves for signs of too much or too little light. Pale or floppy leaves often mean the bulb isn’t getting enough light, while scorched tips can indicate overexposure.
3. Maintain a Cool Environment
Temperature plays a big role in the health of your hyacinth. A cool environment mimics their natural growing conditions and ensures longer-lasting blooms. Aim to keep the room temperature between 50–65°F (10–18°C).
If the room is too warm, the bulb may bloom too quickly, causing the flowers to fade faster. In contrast, a very cold environment can slow down growth.
Avoid placing the vase near heat sources like radiators, vents, or direct sunlight. Similarly, keep it away from drafty windows, doors, or any openings.
Nighttime temperatures can be slightly cooler than daytime, which is perfectly fine. This mimics the natural day-night cycle that hyacinths would experience outdoors.
Finally, if you notice rapid growth or wilting, check the temperature first. Adjusting the environment can often correct these issues and help the bulb thrive.
4. Trim Roots as Needed
The roots of a hyacinth bulb can grow long and tangled in a water vase. Regularly trimming them keeps the plant healthy and the vase looking neat.
Use sharp scissors to trim the plant roots. This prevents bacteria from entering the plant through cuts. Trim only the ends of the roots—just enough to keep them manageable.
Long, tangled roots can sometimes block light from reaching the base of the bulb. Trimming helps maintain proper light exposure and ensures even growth.
If the roots appear slimy or brown, it’s a sign they need immediate attention. Gently rinse them in clean water before trimming to remove any buildup.
Healthy roots are white and firm. Regularly checking and trimming them not only promotes a clean appearance but also encourages better nutrient absorption.
5. Avoid Submerging the Bulb
Hyacinth bulbs are designed to sit just above the waterline. Submerging the bulb itself increases the risk of rot, which can quickly ruin the plant.
Ensure that only the roots are in contact with the water. The base of the bulb should be slightly above the waterline. This setup allows the bulb to absorb moisture without becoming overly saturated.
If you notice the bulb sitting too low in the vase, adjust its position. Many water vases are shaped to cradle the bulb above the waterline, so choose a design that supports this.
Check for signs of rot, such as a mushy texture or unpleasant smell. If you detect any issues, remove the bulb immediately, trim affected roots, and clean the vase thoroughly before reintroducing the plant.
By keeping the bulb dry while allowing the roots to hydrate, you provide the perfect balance for healthy growth and vibrant blooms.
Do hyacinth bulbs multiply?
Yes, hyacinth bulbs can multiply, though the process may take some time. Mature bulbs produce smaller bulbs, called offsets or baby bulbs, that grow around the main bulb. You can use these offsets as seeds. It’s easy to grow them into new plants with proper care.
Hyacinths in water vases rarely produce offsets because the environment doesn’t mimic the soil’s natural conditions. However, when planted in soil outdoors, hyacinth bulbs are more likely to multiply over a few growing seasons. The main bulb stores energy from sunlight, fueling the growth of offsets underground.
If you’re replanting hyacinth bulbs, be patient. It often takes a few years for offsets to grow large enough to flower on their own. During this time, you’ll notice small, developing bulbs clinging to the main one when you dig it up. Carefully remove these offsets and plant them separately to give them room to grow.
For the best results, ensure the bulbs are in nutrient-rich, well-drained soil. Providing fertilizer and letting the foliage die back naturally helps the bulb store energy for itself and its offsets. Over time, you’ll have a healthy collection of bulbs, turning one hyacinth into a thriving patch of flowers.
Do you cut hyacinths back after flowering?
Yes, you can cut hyacinths back after they have finished flowering, but it’s essential to do it the right way. Once the flowers fade and lose their vibrancy, they no longer benefit the bulb. At this stage, you should remove the flower stalk.
Start by cutting the flower stalk close to its base. However, leave the green leaves intact. The leaves are crucial because they absorb sunlight and convert it into energy, which the bulb stores for its future growth. Cutting the leaves too early can weaken the bulb and reduce its ability to bloom again.
Over the next few weeks, the leaves will naturally begin to yellow and wilt. This process might take longer than you expect, but it’s necessary for the bulb to recover. Once the leaves turn brown and dry out completely, you can cut them off at the base. Removing them prematurely interrupts the natural cycle and can harm the bulb.
While the bulb is still in the ground or a pot, continue to water sparingly until the leaves are fully dried. Properly managing this phase ensures the bulb will be healthy and ready to enter its dormant period, increasing the likelihood of vibrant blooms in the next season.
Caring for plants post-bloom is crucial. If you’re growing passion flowers, here’s a guide to cutting them back to the stem for best results.
Can you leave hyacinth bulbs in pots?
Yes, hyacinth bulbs can stay in pots after they have flowered, but they require some care to thrive. Leaving bulbs in pots is an excellent option if you don’t have garden space or prefer the flexibility of moving the pots around.
However, there are a few things you need to do to help them stay healthy for the next season.
After the flowers fade, let the leaves remain on the plant. The leaves are still absorbing sunlight to create energy for the bulb’s storage. Keep the pot in a bright location where it gets indirect sunlight.
Once the leaves are fully dried, you should stop watering the pot entirely. This signals to the bulb that it’s time to rest. At this point, move the pot to a cool, dark place. A basement, garage, or unheated room is ideal. Ensure the location doesn’t get too warm or too damp, as extreme conditions can harm the bulb.
When it’s time to replant for the next season, refresh the soil in the pot to provide nutrients. Old soil can lose its quality, which affects the bulb’s growth. By following these steps, your hyacinth bulbs can remain in their pots and bloom beautifully year after year.
Can I leave hyacinth bulbs in the ground?
Yes, you can leave hyacinth bulbs in the ground after flowering, and in many cases, this is the easiest and most natural option. Hyacinth bulbs are hardy and well-suited to overwintering in the soil, especially in climates with cold winters. However, there are a few essential steps to ensure their health.
Once the flowers have faded, do not remove the leaves immediately. The green leaves are still working to store energy for the bulb’s next bloom. Allow them to stay on the plant until they naturally turn yellow and dry out. This process can take a few weeks but is crucial for the bulb’s recovery and preparation for dormancy.

